الأحد، 10 يونيو 2012

Makeup Geek Eyeshadow Swatches + Review!

 So a few weeks ago I was contacted by someone from Makeup Geek (MUG) asking if I wanted to try some eye shadows for a review. Of course I said yes!! I had already bought 3 eye shadows myself and was planning to buy more soon anyway.
Let me start with the service.... Shipping was fast and they were quick to reply. Although there was a mishap with shipping; they accidentally sent me 6 of the wrong colours, so I messaged them to let them know & they said I could keep them as it wasn't my mistake. I would have felt happy to return them though especially if it was somebody's order!
 Please read on for the review & swatches.

What the pans come in, Picture from the Makeup Geek Website.
Disclaimer: I did not pay for these eyeshadows (except for the 3 mentioned) and all thoughts & opinions are 100% my own. I want to apologize with the inconsistency with the lighting in the photos! Some of the lighting has been enhanced but the colours have not.
 I am happy that I selected a range of different colours but I realized I should have chosen more mattes too. But the eye shadows I accidentally received ended up having a few mattes. I am really happy with the colours I have, but yet there are still so many more gorgeous colours I long for.
MUG shadows are really are pigmented.. although the shimmer/ glitter shadows go on a lot more smoothly than the matte ones, but  I could not complain with any of the shadows I received.
The eye shadow pans come in cute little cardboard slips but after a while taking them out and putting them back in gets annoying. (I still have yet to order a Z palette!). They are also meant to be the same size as a MAC pan so if you have spare MAC palettes you have no problem with storage.Or if you wish they are available in compacts.
Ok so on to the swatches.... all eye shadows are swatched by themselves so clearly they will turn out even more pigmented with a primer & base underneath. But you can see how pigmented some truly are! Please click the pics to see them bigger. All top pictures are no flash & bottom are with flash (when there are 2 lol)

Neutrals:
 L-R: Moondust; A beautiful shimmery gray taupe colour.
Cinderella;  A pretty satiny light pink/ tan colour great for all over the lid for any neutral look.
Glamorous; Metallic bronzey gold. These swatches don't do it justice. So pigmented!
Vanilla Bean; (Bought myself) A nude matte colour (as you can barely see it on my skin tone lol) that's great as a transition colour or as a matte highlight. Needs a few swipes to get it to show up.
Shimma Shimma; A gorgeous shimmery light highlighting colour. Just glides on perfectly.

Gray Spectrum:

L-R Mercury;  a beautiful shimmery silver that goes on so smoothly.
Stealth; a matte gray, you definitely need to pack this on for good payoff.
Galaxy; Quite a bit darker than Stealth (although it doesn't look like it in the pan) & shimmery. Goes on smoothly.
Corrupt; A highly pigmented matte black with a hint of a sparkle (as described on their website but its so true).
Purples:
 Purples:
L-R Wisteria; matte light lavender, a gorgeous colour although the colour payoff is not the best
Purple Rain; matte dark purple, a pretty true purple but with bad payoff, that can blend into a gray if not careful.
Burlesque; A stunning metallic-y, shimmery burgundy shade
Sensuous; (purchased msyself) I loovee this beautiful, shimmery purple, even though you have to be careful to not blend away the sparkles, but sadly it faded away even with a primer.

Greens & Blue:
 I hate that my camera didn't pick up the true colours of these!
 L-R Shimmermint; A gorgeous shimmery minty green colour
Poison Ivy; in my pan pics it pulls more brown but this is a nice satiny olive colour.
Envy; looks more gray in the pan, but this is such a sexy, mossy green with a metallic finish.
Mermaid; (bought myself) My fave of all, this metallic blue glides on, the pigmentation is lovely and the colour is TDF.
Sea mist; a highly pigmented emerald green that kinda pulls off turquoise-y too with a lovely shimmer.

Reds & Orange

L-R Chickadee; A matte orange-y yellow colour, which is super pigmented.
Mandarine; A beautiful bright orange with flecks of gold, which is highly pigmented. I haven't had a problem with the glitter fall-out.
Razzleberry; goes hand in hand with Mandarine, a stunning bright raspberry pink with gold glitter, be careful this isn't a true red but it's stunning none-the-less.

Once again I apologize that the swatches did not come out the best, but as I said these were swatched on their own with no primer underneath.

Here are some links to looks I've done already, I'll keep adding more as I post them.
Using Shimmermint, Stealth
Neutral with Moondust, Burlesque
Silver Smokey with Mercury, Galaxy, Sensuous
Overall

Packaging:The pans themselves are great if you want to put them all in a big palette together or compacts are good if you prefer to keep a few in your bag. 5/5
 Pigmentation: Apart from a few mattes, the pigmentation of these are beautiful 4/5
Cost: Very affordable, pans are $5.99 & compacts are only $7.99, Shipping is worldwide & affordable. 5/5

I totally recommend these eye shadows to you, for half the price of a MAC eye shadow with just as good quality, these will definitely be an investment to your collection.

You can go here to get your hands on these! There are 56 colours to choose from.
 I also believe I may have other similar colours from different brands, if you wish I will swatch them side by side for comparison.
Thanks for looking & I hope this review was helpful to you!

الجمعة، 8 يونيو 2012

Shimmermint Eyes + Nyx Stick Blush Review

Muted greens are oh-so pretty for spring. Although it's past that now, especially that I'm in winter. I suppose that's where the grays come in handy, haha. I don't believe in restricting certain looks for certain times of the year, especially mostly everything is opposite to me and I get inspired by summer looks when it's winter, mmkay!! :P
Saturation enhanced to show the colours better.


15 Concealer palette
Revlon Photoready in Shell
Bourjois Healthy Mix Undereye concealer
Palladio Rice Powder in Translucent

I used all Makeup Geek eye shadows
Lid & Lower Lashline: Shimmer mint with a hint of Poison Ivy
Crease: Stealth
Outer V: A hint of Galaxy
Maybelline Master Precise eyeliner

Cheeks: Nyx Stick Blush in Tulip
Lips: Australis Colour Inject l/s in Samba

Nyx Stick Blush Review
*not my pic*


 This is a beautiful blush that is great for just a hint or a lot of colour, depending on how much you apply. I bough mine in the colour Tulip from cherryculture.com for $6.

To apply I like to use my index & middle finger to apply to the apples of the cheeks & then blend out with the Sigma 84 Angled Kabuki brush to really blend into the skin. It also looks lovely on the lips as I thought to try out later haha.

This blush looks great by itself but to make it last even longer I'd advise to dust either translucent powder or a similar blush colour over the top.

The first 2 pics are not long after I applied it with a tiny bit of translucent powder over the top, but you can see in the last pic after wearing it all day it has not worn off.
These were released for their spring collection and although it is now winter for me I get a spring feeling from these.
Picture from the Nyx website, I don't think the colours are as accurate as to what I've seen of different swatches.
Although I've only tried one I definitely want to buy more so I would recommend these for a beautiful natural glow.

P.S I've just added this look to the MUG Idea Gallery
http://www.makeupgeek.com/idea-gallery/look/shimmermint/
So please click here to "love" it . Thanks!

الخميس، 7 يونيو 2012

6 Different ways to curl your hair

I just came across this video and wanted to share- It's so cool that you can get so many different types of curls with the same tool! Also I think the guy is pretty funny, hehe.
What's your fave way to curl your hair, and what do you like to use?
xx

الاثنين، 4 يونيو 2012

Red Lips for MS Day

 Last week in a magazine I saw an add that said to wear red lipstick for MS (Multiple sclerosis) so I had a reason to wear red lips at work(although I wear them when I feel like it), & nobody knew that was why. I teamed it with neutral eyes using Makeup Geek eye shadows. Hope you like!


 If I may say so myself, I think this is the best lip lining I've done in a while. Although up close it does not look as good.

Face products are all random since I'm trying to use up older products to get rid of them.
However blush is firstly a cream by Rimmel followed by Candyfloss by BYS.

Eyes: (All Makeup Geek): Moondust on the lid, Burlesque in the crease & lower lash line, Shimma Shimma as a highlight.
Eyeliner: Smashbox cream duo (used a bit of the black & brown)
I just know I have used some other eyeshadows but for the love of me I cannot think what! I can tell there is something different in the outer v.

Lips: Random red lipliner
Nyx soft matte lip cream in Amsterdam
Maybelline Are You Red-dy L/S over the top for BAM in-yo-face lips ;)

Oh and my current *at the time of writing* mani... O.P.I Koala Berry with pink glitter (random polish) for the accent nail which I am still obsessed with!

xxx

الأحد، 3 يونيو 2012

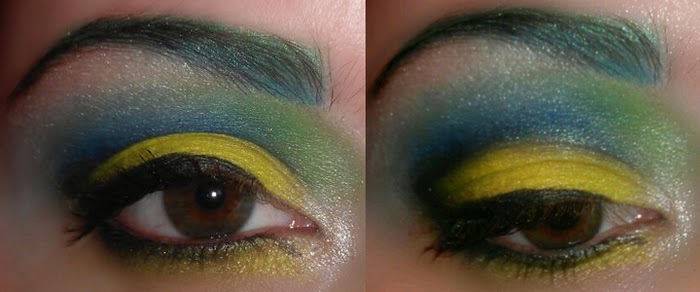
Exotic Fish Makeup Look

 I was inspired by one of the girls on a makeup board, whose makeup reminded me of an exotic fish, hence the title lol, so I took those colours and had a play. I did this 2 times, one was a play around that took me 5 minutes on a Sunday night and the other was a more wearable version.

 This was the play around one, as you can see it's not perfect, especially the lower lash line. I do love the brows though and intend to wear them coloured out one time haha.

 This is how I wore it out. I toned down the lower lashline & the colours in the crease to make it more wearable & of course had my normal eyebrow colour lol but it was still a lot of fun to wear.


Nyx JEP in Milk
All colours from the 120 palette, except the black is from the Sleek Bad Girl Palette
BYS Gel eyeliner
Nyx White pearl as a highlight.

Blush: Nyx glow cream, topped with Revlon Hushed Blush in A Floral Affair
Lipstick: Elizabeth Arden (I cannot find it to retrieve the name, sorry!!)

Next time I will add another colour into the waterline because it looks a bit bare to me. It would also look great with Falsies.

Please go here to "love" this on Makeupgeek.com

Thanks for looking, I hope you like it!!
xx

الاثنين، 28 مايو 2012

Makeup Brush Essentials: Eyes & Lips

This is a post that is hopefully helpful to the beginners out there who cannot decide what type of brushes they should be looking for. Don't get me wrong, my brush collection has taken a loong time to slowly build up, but as long as you start with the basics you can keep adding to it later on. You also don't need to buy the most expensive brushes for a great result.
However today I will not be focusing on the brands, simply on the type of brushes. I hope that makes sense lol.


 Lid brushes
*Apologies for the brushes not being in the same order, D'oh!*
Top: Synthetic Flat brush: This is not absolutely essential, but it is good for applying primer & cream eyeshadows to the eyelids. Synthetic is best for creams as it will not soak up all the product, making it easier to clean.
Middle: Large Stiff Shader brush: This is good for packing a whole lotta colour onto the lid.
Bottom: Small Shader Brush: Simply used for the same method as the larger one, however it is better for precise application of different colours to the lid.
Stiff shader brushes are also good for using the very tip to apply eyeshadow to the lower lash line.

 Eyeliner
Eyeliner brushes come in different shapes depending on the look you want to achieve.
Angled liner brushes: In this picture these are the same type of eyeliner brushes, however I use the top one for eyeliner and the bottom one for my eyebrows. That way I don't have to worry about cleaning them all the time & getting black on my eyebrows, lol. You can use this with Gel Eyeliner but I prefer to use it to pack on eyeshadow on top of my eyeliner for longevity.

The top 2 are thin brushes great for Gel & liquid eyeliner. You can see the only difference to the bottom ones are that the handles are shaped normally.
The bottom 2 are Bent Eyeliner brushes. I simply have 2 for light & dark colours. These are great because you can easily do your eyeliner without worrying about the handle getting in the way. Please note you do not need to own all of these. Whatever your preference is fine. Once again these are good for cream & gel eyeliner. You can even dip it into your liquid eyeliner if you wish.

 Crease Brushes
These are a few different types of brushes which are good for applying colour to the crease & outer v.
Top: Fluffy crease brush: This is good for applying & blending colours to the crease.
2nd: Pencil Brush: Good for precise application to the crease & outer v. Also good for the lower lash line if you have larger eyes or for smudging out eyeliner.
3rd: Pointed crease: (I had washed this the night before so its a bit out of shape). Really good for precise crease work e.g. for cut creases
Bottom: Pointed crease & Outer v: (again lol) Same concept as the one above, but especially good for the outer v because of the size.

Blending
Top & 2nd: Stiff dome blending brushes: TMakeup Geekhese are really versatile for applying a wash of colour over the lid & crease, blending colours on the lid & crease while depositing colours.. I recently purchased a second one because it doesn't take long for them to get dirty lol.
3rd: Soft Dome : This one is slightly pointed however because it's not stiff it's great for blending colours together on the lid or blending out in the crease. You can live without it if you have a stiff blending brush.
4th & 5th: These are just a couple of other different brush shapes good for blending. Once again they are not needed,but I think the more the better, especially if you are doing a look where you need a clean brush to blend out & one with colour to add more colour on at the same time. Hope that makes sense ;)

Other Eye Brushes
Top: Brow & Lash brush: Just any run of the mill brush like this should do, good for combing through your brows & lashes to get rid of clumps.
2nd & 3rd: Highlighting Brushes: These are good for highlighting on the brow bone & tear duct. The 2nd brush is good for blending it out as it's applied & the 3rd, because of the angle & being stiff, is good for precision.

Lips
The top brush is good for applying your lip colour all over, the bottom is good for precise application right around the lip line. If you use a pencil lip liner first you don't exactly need the 2nd brush.

I hope this is helpful & not confusing. All in all you do not have to have everyone of these brushes especially if your starting out, you can use certain brushes for different things. You also don't need to spend the big bucks for great brushes. I'll post some websites for great affordable brushes (all are non affiliated).

Makeup Geek As far as I know these are crown brushes that have been repackaged (Please correct me if I'm wrong) but they are so affordable & offer worldwide shipping.

Sigma They offer a great selection on many different types of brushes, duping the famous MAC 217 brush (Sigma E25, one I bought not too long ago)

Eco Tools The 6 piece brush set is great for starting out (I love the eyeliner brush)

Tip: DO NOT buy MAC brushes (or really MAC anything) on eBay. Most of the stuff on there is fake. You cannot buy a whole set for the price of one brush, haha. Just a warning!


الجمعة، 25 مايو 2012

Anniversary EOTN, Smoky with Makeup Geek

The other night was my SO & my 1 year anniversary of engagement, I can't believe how fast the year has gone! We often get the question "when's the date?" & fortunately we haven't really had "Why did you get engaged if you weren't planning to marry straight away?" so you can guess we don't have a date & that's how we want it for a while, lol. I'd rather have completed my traineeship before having to worry about planning something so big.
~Anyway~
We just went out for tea, nothing too fancy because that's the way we wanted it lol. But I still wanted to do my makeup nicely. It's certainly no first-date makeup & probably a bit too much for some people but it was just like any other occasion to go out for dinner.
I used a few Makeup Geek (MUG) eyeshadows -reviews and swatches coming up soon!). Here it is.


I managed to get one decent-ish face photo because I took these at night and I don't really have good lighting around.

1.  Mercury 2. Galaxy (also lower lashline) 3. Stealth 4. Sensuous (lower lashline as well. 5. UD Bootycall 6. Vanilla Bean
BYS gel eyeliner. Bourjois Curling mascara (Can't think of the whole name sorry!)

For the cheeks I used Nyx's cheek tint in Tulip & lips I think was just a nude lipstick with a coral gloss over the top. If you want more details let me know but I didn't want to focus on the lips! Especially as I knew it would just come off straight away haha.


Like I mentioned I will have some Makeup Geek eyeshadow swatches coming up in a couple of weeks (if not before- that is forever to wait I know) so keep coming back to look.

Thank you for looking!